Tips to Make the Most of Your Interior Metal Building Shots
Part one of this two-part series on metal building photography offered a dozen guidelines for improving exterior building pictures. Many of these same tips apply to steel building interior photography, too. However, getting great shots inside also presets unique challenges.
A Picture is Worth a Thousand Words; a Great Picture is Worth $19,000
 So why all the fuss about metal building photography? Because it really PAYS to have excellent photos of any property you plan to sell or lease.
Today in the residential real estate market, 90% of all consumers start house hunting online. The majority of commercial and industrial property buyers and renters all investigate properties on the Internet.
Virtually all shoppers look first at the property’s photos. In fact, surveys show 40% of online shoppers admit they never even glace at the elaborate descriptions of the real estate.
You have only one chance— and a just few seconds— to impress your potential buyer online before they rapidly click away to another site. Why blow it with an amateurish photo that does not do your property justice?
A quick snap with your smart phone is not the smart way to go.
Not only does excellent steel building photography improve your ability to sell a property, it increases the selling price.
Research shows professionally photographed homes sell for as much as $19,000 more than those portrayed by amateurish pictures. Commercial and industrial properties with clear, flattering photos are also more likely to generate a higher price-per-square-foot.
Here are seven tips for improving your interior metal building photography:
1. HIT the LIGHTS: In general, the more interior light, the better the photos.
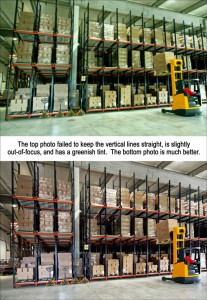
Restaurants, offices, and stores constructed with steel are inclined to have bright lighting. However, florescent lighting casts a sickly greenish tint to the photo. Color correcting the photo in Photoshop or other photo-enhancing software will help. (Also, try using a pink filter to counteract the greenish color.)
The strength of steel allows many metal buildings to have huge, open interiors. Churches, aircraft hangars, gymnasiums, and warehouses, for example, create large open spaces with towering ceilings. To generate enough light for these large expanses, add several constant lights on stands. Remote wireless flashes and strobes may also be used to enhance lighting.
Mounting the camera on a tripod and increasing the exposure time will also help brighten shots of a cavernous space.
In bright, harsh sunlight, interiors with a lot of glass windows or doors create too much contrast between inside lighting and natural outside light. The world outside the glass bleaches out, while the interior looks too dark. Again, increasing the inside lighting is one choice. Shooting in the early morning or evening is another way to balance the lightning.
 2. COMPOSITION: Our eyes tend to overlook details when scanning a room. Make a habit of seeing the whole picture. Remove all objects that distract from the shot: trashcans, clutter, coffee cups, and the like. Make sure blinds are open and vertical. Open curtains. Straighten lampshades. Fluff pillows. Straighten bedspreads. Add potted plants.
(I had what I thought was a beautiful shot of my second steel-framed home. It had a wood-covered vaulted ceiling with a large fireplace on the endwall, surrounded by fixed-glass windows. I was so focused on the ceiling work and fireplace, I never noticed the blurred, looped ceiling fan cord hanging right in the center of the picture, like a hangman’s noose— until after I had hundreds of 8”x10” blowups of the shot distributed!)
Check for mirrors and shiny surfaces to avoid capturing your own shadow or reflection in the pictures.
3. KEEP it LEVEL: As with exterior photography, keep the camera lens parallel to the walls. Tilting the camera skews vertical lines in architecture, causing the building to look structurally unsound.
Make sure all wall edges, cabinets, bookcases, doorframes and windows appear vertical.
Again, photo software improves minor problems with vertical lines. However, some clarity is lost when stretching the photo back to perpendicular. Using a tripod or camera bubble level eliminates most line distortion.
4. STAY in FOCUS: Focus is more difficult on tight interior shots. No photo software fully corrects out-of-focus photos. By keeping the camera perfectly still, a tripod helps maintain perfect focus.
5. WIDE-ANGLE LENS: Use a wide-angle lens in tight spaces like closets or bathrooms to encompass a complete sense of the space. (However, use wide-angle lenses with caution, as they distort vertical lines.)
6. MORE SHOTS: Today’s digital photography allows unlimited photos at no extra cost. The more shots you take, the greater your chance of creating that breath-taking, moneymaking photo that entices buyers to your property.
Try taking pictures at different levels. Start with chest high, and then take others above and below.
7. MAKE Your POINTS: Be sure your photographs covers all the selling points of the property.
Share Your RHINO Metal Building Photography
Many RHINO customers generously share photos of their building projects with us.
We invite all RHINO customers to tell us their stories and send us their metal building photos. Your project might be featured on the RHINO steel building photography gallery or an upcoming RHINO blog. Send photos and remarks to [email protected].
To discuss your metal building needs, call RHINO Steel Building Systems today at 940.383.9566.
